This page documents the installation of an interceptor land drain. An interceptor drain is intended to collect groundwater and divert it elsewhere away from a vulnerable area, which might be a pavement, a garden or even a building. In this particular case, the garden is approximately 500mm lower than the adjacent agricultural land, and each winter run off and excess groundwater washes in from the field and submerges the garden for several days. The natural ground is heavy clay and it can take a week or longer for the flooding to dissipate naturally, leaving the garden and the patio areas in an unmanageable condition. 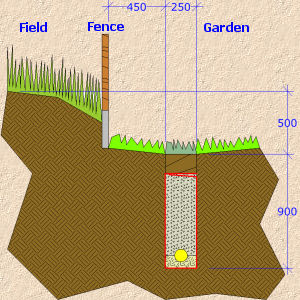 | |
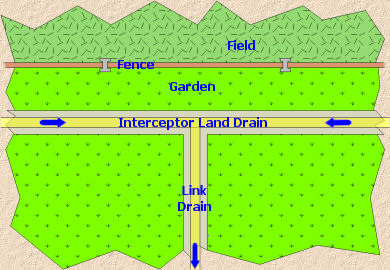 The main interceptor will run just inside the boundary fence | |
| The plan involved installing an interceptor drain just inside the boundary with the adjacent field and then linking this to an outfall . While it would have been possible to use a standard non-perforated pipe to construct the link pipe, it was decided to use a perforated land drain to help drain the garden through which it runs which is naturally damp even during the summer months. Obviously, the first thing is to get the trench dug and the resulting spoil carted away. An interceptor drain involves replacing a strip of natural ground with a trench of pipe-bedding standard gravel, so there will be a significant quantity of material to be removed from the site. Clay bulks-up by approximately 60%, so each cubic metre excavated will generate somewhere around 1.6m³ of spoil.As the excavated material tends to be heavy clay (as in this case) the potential for losing it on-site is limited. Any turf or topsoil that is stripped should be stored for re-use - it will be needed as top cover for the drain once it is completed. 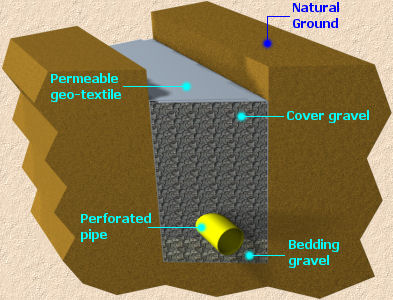 A bedding layer of the gravel is placed in the base of the trench and spread along its length. This bed layer should be approximately 100mm in depth and levelled out to create an even bed for the pipe that will be installed nextIndividual lengths of pipe can be joined together using the connector, one of which is usually attached to each 25m coil. This is a simple 'push' connector that uses a ridge on its inside .The trench should be as narrow as necessary to facilitate working. There is little to be gained by constructing an over-wide trench, as the flow capacity of a 250mm wide trench is usually more than adequate for most projects. Ideally, the ground would be protected using decking sheets, large 2.4 x 1.2m boards of ply or other timber. The trench should be trimmed as neatly as is feasible, but there is no great need for perfection. The sides should be vertical or battered back slightly, and the base should be flat and even with as true a profile as possible. The gravel to be used for this interceptor drain is a 10mm clean angular gravel. This particular gravel is a crushed sandstone, although a 10mm pea-gravel could have been used. It's best to avoid limestone unless there is no viable alternative material available. A bedding layer of the gravel is placed in the base of the trench and spread along its length. The bed layer should be 100mm in depth and levelled out tomake an even bed for the pipe that will be lay inside nextIndividual lengths of pipe can be joined together using the connector, one of which is usually attached to each 25m coil.The pipeshould be in placed into the trench &, positioned centrally. Eventually, the whole trench is backfilled with the pipe bedding gravel to a level approximately 150mm below the top. Gravel is self-compacting, ,stamping it down byt will achieve adequate compaction at this stage.The final step is to backfill the top of the trench with the topsoil that was salvaged earlier and then, if necessary, to replace the tur. There will, of courses, be some slight settlement of the trench over the following few weeks, and it may be necessary to top-up the topsoil cover. Over the next few months, the ground will recover and the installation will become virtually undetectable. | |