With block paving, most contractors choose to use the small unit kerbs to construct the risers for steps, as they match the blockwork in both scale and colour. We always try to use a riser of a contrasting colour, as this gives an extra visual warning of the presence of a step, thereby reducing the chance of an accident. There are two common kerb units for block paving used to create steps of different heights.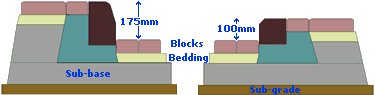 | |
| The small 125x125mm kerb is used as the riser for steps up to 100mm - and we try not to have any step less than 75mm, as that is more of a 'trip' than a step. Ideally, the riser should be 150-175mm, and this amount of upstand is best acheived with the larger, 200x125mm kerb units. | |
| The step needs to be planned in advance. A semi-circular step should be centred on the doorway, so that it looks balanced when viewed square on. Rectangular steps are also best when centred, but other steps may have more of an organic shape and dry-bedding of the kerb units on the ground before laying-on-concrete can help determine the best positioning. | |
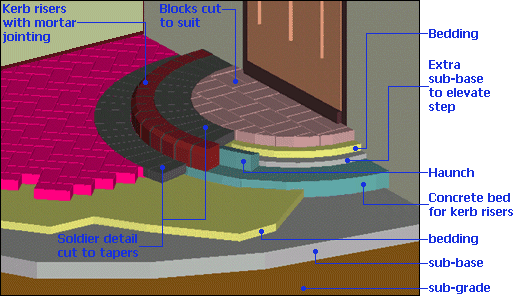
For a semi-circle: For arcs with a radius of 1200mm or less, the tapered radial kerbs may be better suited to avoid open joints, if they are available for the chosen kerb type; alternatively, the kerb units can be taper-cut on site with a power saw or hand tools, although this is hard work. In most cases, mortar jointing gives the riser a more professional look and avoids unsightly open joints. Use a coloured general purpose mortar that complements the colour of the the kerb units rather than a plain 'white' mortar. 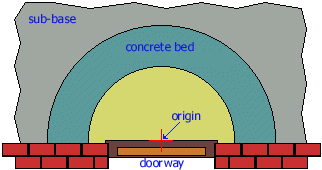 | |
| When laying the kerb units, fix a pin or some other point at the origin of the semi-circle and use a length of string with a knot, a short cane, or a tape measure to ensure each unit is the same distance from the origin. Butter the receiving end of the previous unit with the mortar, then push the next kerb into place, tap down to level and check the leading end with the measure before laying the next unit. The human eye has an uncanny knack of being distracted by even relatively small deviations from 'true' in an arc, so keep the alignment tolerance to no more than ± 5mm |
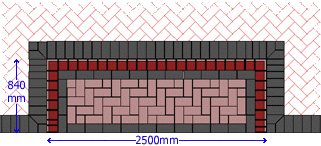
For a rectangle:Construct the sides first, using an equal number of units. Ensure the sides are perpendicular to the building by setting out with a 3-4-5 triangle as described on the Setting-Out page. The surface level of the sides should slope away from the building at approximately 1:40-1:80. Special corner units may be required or they can be prepared by mitre-cutting two standard units using a power saw. Finally, lay the front edge of the riser.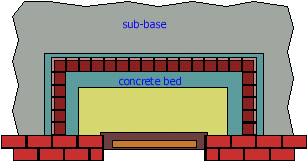 | |
| | |
Constructing the step:Lay the kerb units on a bed of C20 equivalent concrete that is 75-100mm deep. Check the alignment before haunching to the rear, leaving the backing concrete low enough to accommodate the tread paving. Point the joints if required.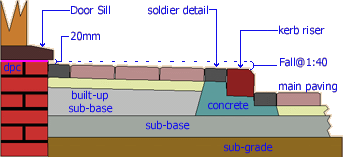 Lay the lower-side soldier blocks. The body paving can be cut-in at this point, or left until the rest of the step is constructed. | |
| Build up the levels within the step with sub-base material or lean-mix (Class E equivalent) concrete. Make sure it is thoroughly compacted with a punnel or similar. It is only on the larger steps that a plate compactor can be used for this essential consolidation, and if it is, extreme care must be taken to avoid disturbing the risers. | |
| Lay the upper tread soldier blocks. We always try to lay these blocks before the riser haunching concrete has set, so that there is no chance of the haunching being left accidentally high. Piece in the rest of the tread paving and seal with jointing sand. If the bedding/haunching to the risers is sufficiently solid, a small plate compactor can be uaed to compact the tread paving, but we find that a rubber-headed hammer is best when the concrete is still 'green'. | |
| |  |
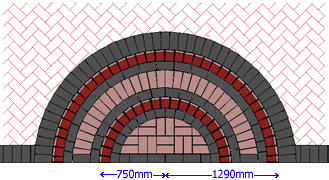
| | This step has been drawn to scale and represents a step with a radius of 900mm. This means the step is 1800mm wide against the wall and projects 900mm from the brickwork, which is deep enough to provide a comfortable platform for callers. Semi-circular steps with a radius of less than 900mm tend to feel small and engender a feeling of instability when standing upon them. Rectangular steps can be as shallow as 450mm, but we find that a comfortable minimum would be 600mm, with 750mm preferred. 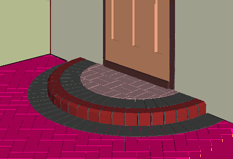
| ||||||||