Showing posts with label DRAINAGE. Show all posts

Thursday, 28 May 2009

Drainage


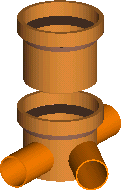
Types of pipes & Fittings

Fitting an Aco channel Fing new Gutter

The first step when planning to fix additional drainage points to an
existing system is toidentify the type of system, ie, is it a dual system
with separate foul and surface waterpipelines, or is it a combined
system, where foul and surface water are mixed togetherand carried
in the same pipes?

Checking the system:

While the pointers listed above can aid in identification of a sewer system,
the actualclassification of a drain must be checked below before installing
any drainage

1 - Lift cover and check layout of drainage
within chamber

2 - try to identify fittings that are likely to be connected to the chamber
under inspection.These must be upstream of the chamber, and may be
rain water pick-ups, kitchen wastegullies, toilet stacks, linear drains etc.

3 - put a garden hose into the fittings and see if the water appears in the
chamber. For indoor fittings, such as baths, wash-basins or toilets, try
turning on a tap or flushing the cistern. If in doubt, a drain dye can be
added, turningthe water a distinctive colour that will be readilyidentified
if it passes through the chamber under inspection.

Fittings and Access Points

There is a huge range of fittings available for all types of drainage systems.
These include gullies,hoppers, traps, bends, and junctions as standard
items, as well as access chambers,roddingeyes and inspection chambers
which are designed to grant access for inspection and/or maintenance.
Manholes tend to be larger chambers , with half-pipes known as 'channels'
setinto the base .

Access points:
Rodding eyes Access Fittings Inspection chambers & Manholes:
Must be installed at
* head of run
* bend or change of direction
* change in pipe diameter
* junction, unless all runs connected to junction can be rodded from another
access point.

Drainage Layout

Click here PAGE 2
how to - click for animation


Further references:

  • Building Regs 1991 England and Wales especially Part H
  • Building Regs 1990 (Scotland)
  • Building Regs 1994 (Northern Ireland)

  • BS8301 - 'Building Drainage' - BS code of practice
  • BS8005 - 'Sewerage' - Guide to construction of new sewers
  • BS EN295 - Vitrified clay pipes and fittings
  • BS 65 - Vitrified clay pipes, fittings and ducts
  • BS4660/5481 - flexible uPVC pipes
  • Sewers for Adoption Design and construction guide for developers

Monday, 18 May 2009

how to - click for animation

Branch junctions are a simple and cheap method of connecting
a newdrainage spur to an existing line. However, they do not
enable access to the system for maintenance and/or cleaning
and so should only be used with suitable access fittings or for
spurs terminating with a rodding eye. For spurs where access
is required via the junction
, consider the use of an access chamber, as described below.
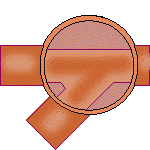
There are two basic forms of branch junction, determined by
the angle of the incoming spur, namely oblique or square.
These are shown in the diagram opposite. Oblique junctions
have the spur joining the main channel at approximately 45°
while square junctions have the spur coming in perpendicular
(90°) to the main channel, although this is 'softened' by the
adjoining spur being slightly curved. Branch junctions may be
single or double affairs, depending on the number of spurs to be
connected to the main channel.
Inserting a branch junction
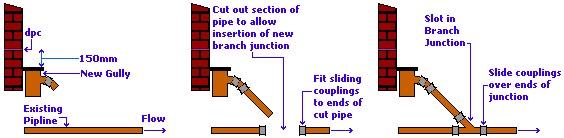
The illustration above depicts how a new drainage spur can be
connected directly into an existing underground pipe by breaking
into the pipeline and installing a branch junction. The section of pipe
to be removed is bestcut out with a power saw, so ensure you have
ample working room.Cut out a section 10-15mm longer than the
length of the branch junction.

Access Chambers

access chamber
Access junction with single 45° oblique inlet and raising piece
These access fittings are ideal for making single connections, and by using raising pieces, they are suitable to a depth of around 600mm. They typically have a lightweight aluminium cover and cost around £40. They should be set to level on a 100mm thick concrete bed but do not normally require a concrete haunch before backfilling.
They come with one or two side inlets set at a variety of angles to suit most situations. Generally 300-450mm in diameter, and 225-300mm deep, with raising pieces generally 225-450mm deep.


Access junction plan view

Installation

Both access chambers and branch junctions can be 'inserted' into an existing pipeline by using sliding or adjustable couplings. A sliding coupling is a normal coupling without the central register. This allows the coupling to be slid completely onto an existing pipe, unlike normal couplings in which the central register ensures the coupling is positioned correctly when joining two pipes.


normal coupling

sliding coupling


An adjustable coupling is a bigger and more expensive affair. They have adjustable collars at each end of the coupling, which are tightened by means of a large 'Jubilee Clip'. They are ideal for awkward connections, or for connecting two different types of pipe.

The process of installing an access chamber is illustrated in
the following pop-up window. Note that a branch junction
can be installed using an identical process


how to - click for animationPage 3


The process of installation is slightly different for the plastic inspection chambers (commonly abbreviate to IC) than for the simple access junction illustrated above. Because an IC has inbuilt couplings, short lengths of pipe, 300-600mm long and known as 'rockers', have to be used to connect the IC to the inlet and outlet of the existing pipe.

These plastic inspection chambers are further discussed on the Manholes page.

Once installation is complete, raising pieces can be added to an access or inspection chamber as required and the cover fitted. The new spur can be connected up to the new drainage point via straight pipes, bends and couplings as required. Any testing required should be undertaken before the backfilling is done in layers 150-225mm thick, each layer being compacted before placing the next.

Saddles

Saddles are a way of connecting to an existing pipe by actually breaking into the pipe via an elliptical or circular hole, rather than cutting out a whole section of pipe and replacing it with a branch junction, access chamber or IC as discussed above. Generally speaking, only pipes of at least 150mm diameter are 'tapped' for saddles, and more often, it is the larger pipes, diameter 225mm or more, that are considered to be viable candidates for a saddle connection.


Pipework connected via a saddle is always of a smaller diameter than the receiving pipe. For instance, a 100mm diameter pipe may be saddled on to a 225mm diameter but a 225mm pipe would NEVER be saddled onto a 150mm pipe.

A saddle is most commonly tapped into the crown, orsurface, of a pipe. A starter hole is made in the receiving pipe, and then enlarged until the spigot of the saddle just fits into it and sits comfortably atop the receiving pipe.On clayware or concrete pipes, creating the hole is a fairly skilled job; on larger pipes, a core-cutter may be used to drill a receiving hole, or a series of smaller holes, say 10mm diameter, may be 'stitch-drilled' to the required perimeter of the hole. On smaller pipes, especially 150mm and 225mm clayware, the hole is normally started with a transverse cut made by a power saw and gradually enlarged with a small hammer. Extreme care needs to be exercised to avoid fracturing the pipe, which would then need to be removed and replaced, a possibly expensive operation.

Plasticware pipes are much simpler to tap, and less liable to fracture. A starter hole is created with a power drill and then a jigsaw or hacksaw blade can be used to enlarge the hole to the required size.

a saddle connection must be properly sealed to the pipe to prevent a collection of debris & effluent. With clayware saddles, a mortar jopint is usually created, bedding the saddle onto the receiving pipe, and then haunching and backfilling around the saddle with concrete. Plasticware saddles vary bewteen manufacturers; some are solvent-welded, others incorporate a collar that encircles the receiving pipe.
how to - click for animationPage 3


http://antihackattack.blogspot.com/